Here are the instructions on how to calibrate the Servo on the GPL Z9000 natural gas odorizer. Zeck Systems/Sentry Equipment originally manufactured this odorization system.
GPL Z9000 Odorizer Servo Calibration
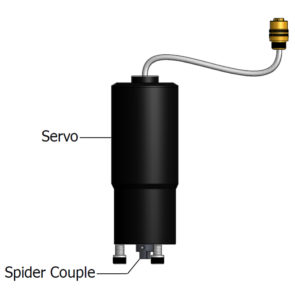
The Servo controls the position of the metering valve during routine operations in the GPL Z9000 odorizer. It opens and closes the valve as necessary to maintain the desired drop rate. As part of the biannual odorizer inspection program, remove the Servo and inspect the metering valve to ensure it is operating smoothly.
From time to time, the Servo needs calibration or even replacement. If your unit requires a new Servo, contact GPL Odorizers or (303) 927-7683 or Linc Energy Systems. When performing the calibration on the line with low flow, close your odorant source valve coming from your odorant tank.
The following will help you calibrate your GPL Z9000 odorizer:
- View the video “How to replace and calibrate a Servo for this gas odorizer (below).
- Download the Z9000 User’s Manual.
- See the instructions in TechView and Local Display below.
Calibrate Servo in TechView
1. Ensure Z9000 is off.
2. Open the Servo Settings screen (Z9000 Settings tab).
3. Click the Arm Calibration button.
4. Within 10 seconds, click the Execute Calibration button.
- If there is not already a motor type alarm displayed, one is generated.
5. Remove the Servo by unscrewing the three bolts holding it to the metering valve housing and set it down in the enclosure.
6. Click the OK button for the field labeled “Click When Servo Unbolted.”
- The Servo should start spinning. The “Calibration Status” field displays the message “Calibration Started,” followed by the timestamp.
7. Reach into the area where the metering valve coupling and “spider” are and turn counter-clockwise until the metering valve is fully open.
8. Click the OK button for the field labeled “Click when Valve Full Open.”
9. Reattach the Servo. The bolts should be finger tight only.
10. Click the OK button for the field labeled “Click when Servo Reattached.”
11. The Servo begins to close the metering valve.
- If the metering valve can close, the field labeled “Calibration Status” indicates “Calibration OK,” followed by the timestamp. The Motor Type alarm clears, and it is possible to start the unit.
- If the metering valve is not able to close sufficiently, the field labeled “Calibration Status” indicates “Calibration Failed,” followed by the timestamp. The Motor Type Alarm does not clear, and it is not possible to start the unit until successful calibration.
Calibrate Servo using Local Display
1. Ensure Z9000 is turned off.
2. Navigate to the first Servo Calibrate screen (S1).
- Press the blue Setting key
- Page down (7) to M2
- Select 3. Servo
3. With the cursor under the setting for the Arm field, toggle (8) setting to Yes.
4. Within 10 seconds, cursor down (5) to the setting for the Execute field and toggle (8) selecting Yes.
5. Page down (7) to the next Servo Calibrate screen (S2).
6. Remove the Servo by unscrewing the three bolts holding it to the metering valve housing and set it down in the enclosure.
7. With the cursor under the setting for the field labeled “Disconnected?” toggle (8) setting to Yes.
- The Servo should start spinning.
8. Reach into the area where the metering valve coupling and “spider” are and turn counter-clockwise until the metering valve is fully open.
9. Cursor down (5) to the setting for the field labeled “Valve Open?” and toggle (8) setting to Yes.
10. Reattach the Servo. The bolts should be finger tight only.
11. Cursor down (5) to the setting for the field labeled “Reattached?” and toggle (8) setting to Yes.
12. The Servo begins to close the metering valve.
13. Check the Mot Typ alarm status (press the red Alarm key, then page down (7) to screen A7).
- If the metering valve can close, the Mot Typ alarm status reads OK, and it is possible to start the unit.
- If the metering valve is not able to close sufficiently, the Mot Typ alarm status reads Alarm, and it is not possible to start the unit until a successful calibration is complete.


